User List⚓︎
1 Function Description⚓︎
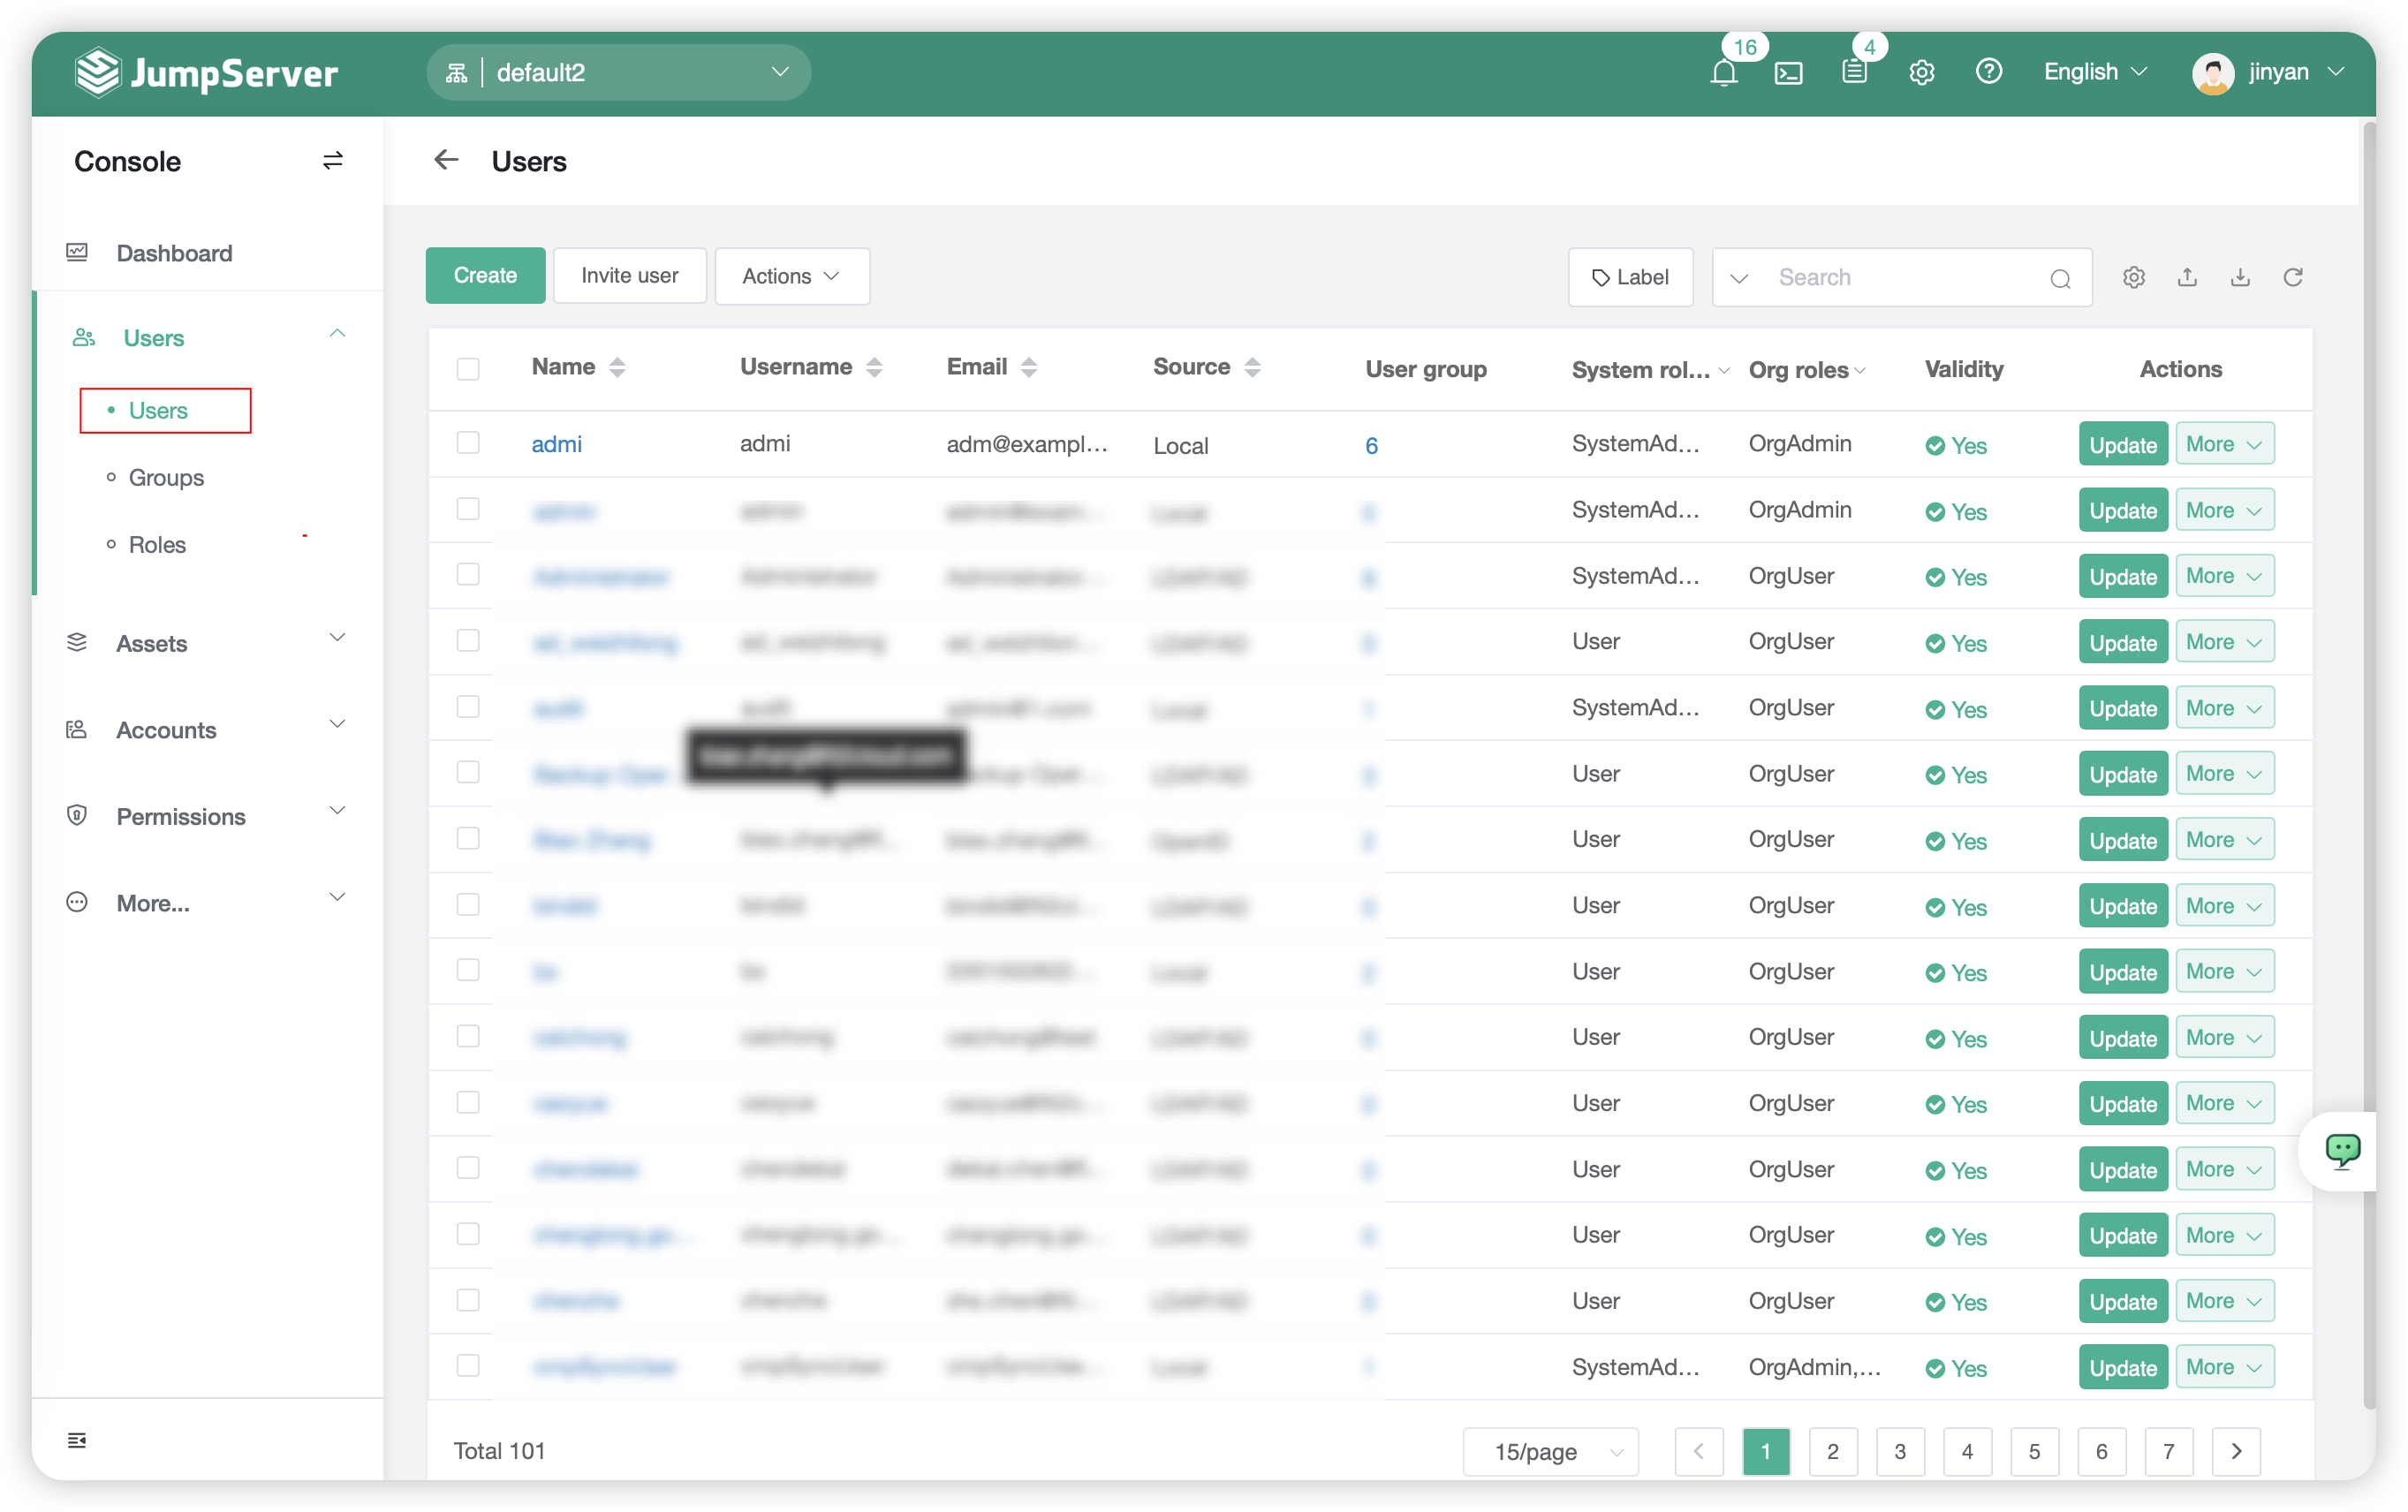
- Click on
User Management-User listbutton,then enter the page of user list - This page primarily operates related to JumpServer users, including adding, deleting, updating, and viewing user information.
2 Create user⚓︎
- Click on
Createbutton inUser listpage,then access the page of user details of creation.
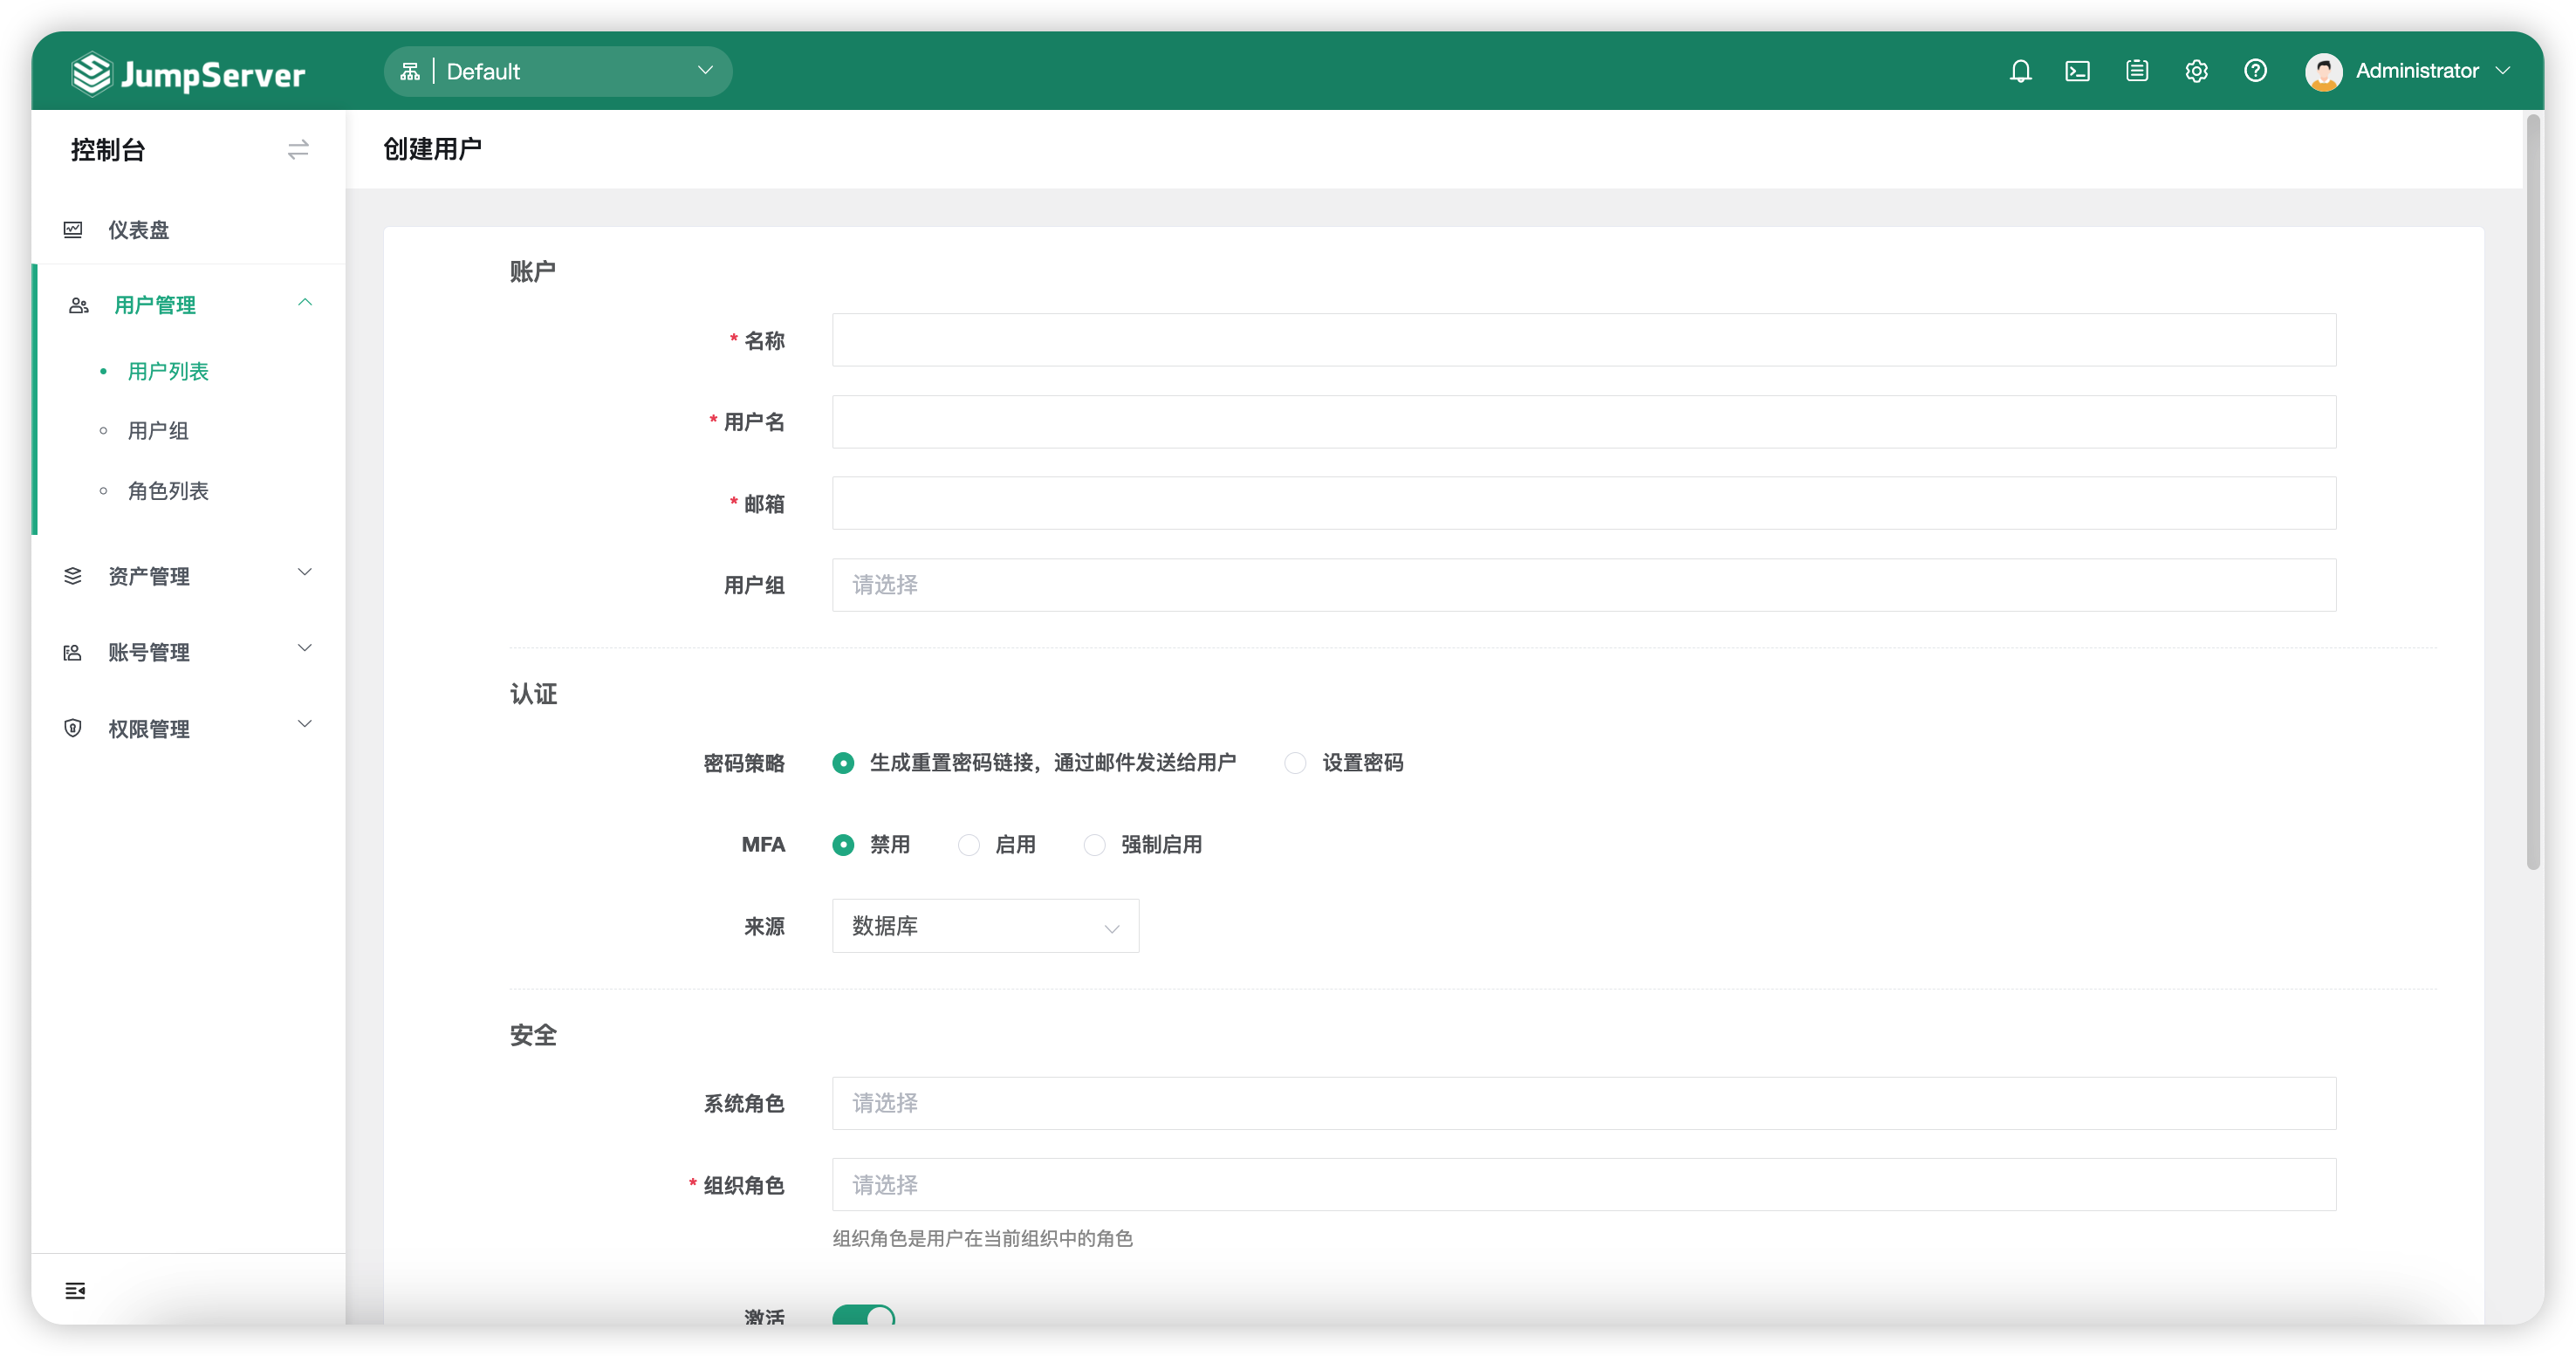
- Detailed parameter description:
| Parameter | Description |
|---|---|
| Name | User identification names can be duplicated |
| User Name | Account used for JumpServer login,can not be duplicated |
| Mailbox | Mailbox of login account,can not be duplicated |
| User group | Organize users into groups for management purposes, primarily for asset authorization. When a particular asset is authorized for a user group, all users within that group will have corresponding permissions for that asset. |
| Password Policy | During the user creation process by the administrator, passwords can be set independently; You can also generate password links and send them to users via email. After successfully submitting user information, JumpServer will send an email titled "Set User Password" to the user's specified email box |
| MFA | Multi-Factor Authentication (MFA). After enabling MFA, when users login the JumpServer system, they will be required to enter their username and password (first security factor), followed by inputting a dynamic verification code from their MFA device (second security factor). The dual-factor authentication provides higher security protection for accounts |
| System role | System roles determine the permissions a user has at the system level, such as System Administrator, Auditor, User, and other custom roles |
| Organizational role | Organizational roles determine the permissions a user has at the organization level, such as Organization Administrator, Auditor, User, and other custom roles |
| Activated | Indicates whether the user's status is active and can login. Inactive status users cannot log in |
| Expired date | The expiration date refers to the last date until which the user can login. After this time, login will not be possible |
| PhoneNum | Optional option to configure the user's phone number, used for receiving "MFA" mobile SMS authentication |
| Optional option to configure the user's enterprise WeChat, used for "Enterprise WeChat" authentication login | |
| Remarks | Optional option,The administrator configures the user's remarks or notes |
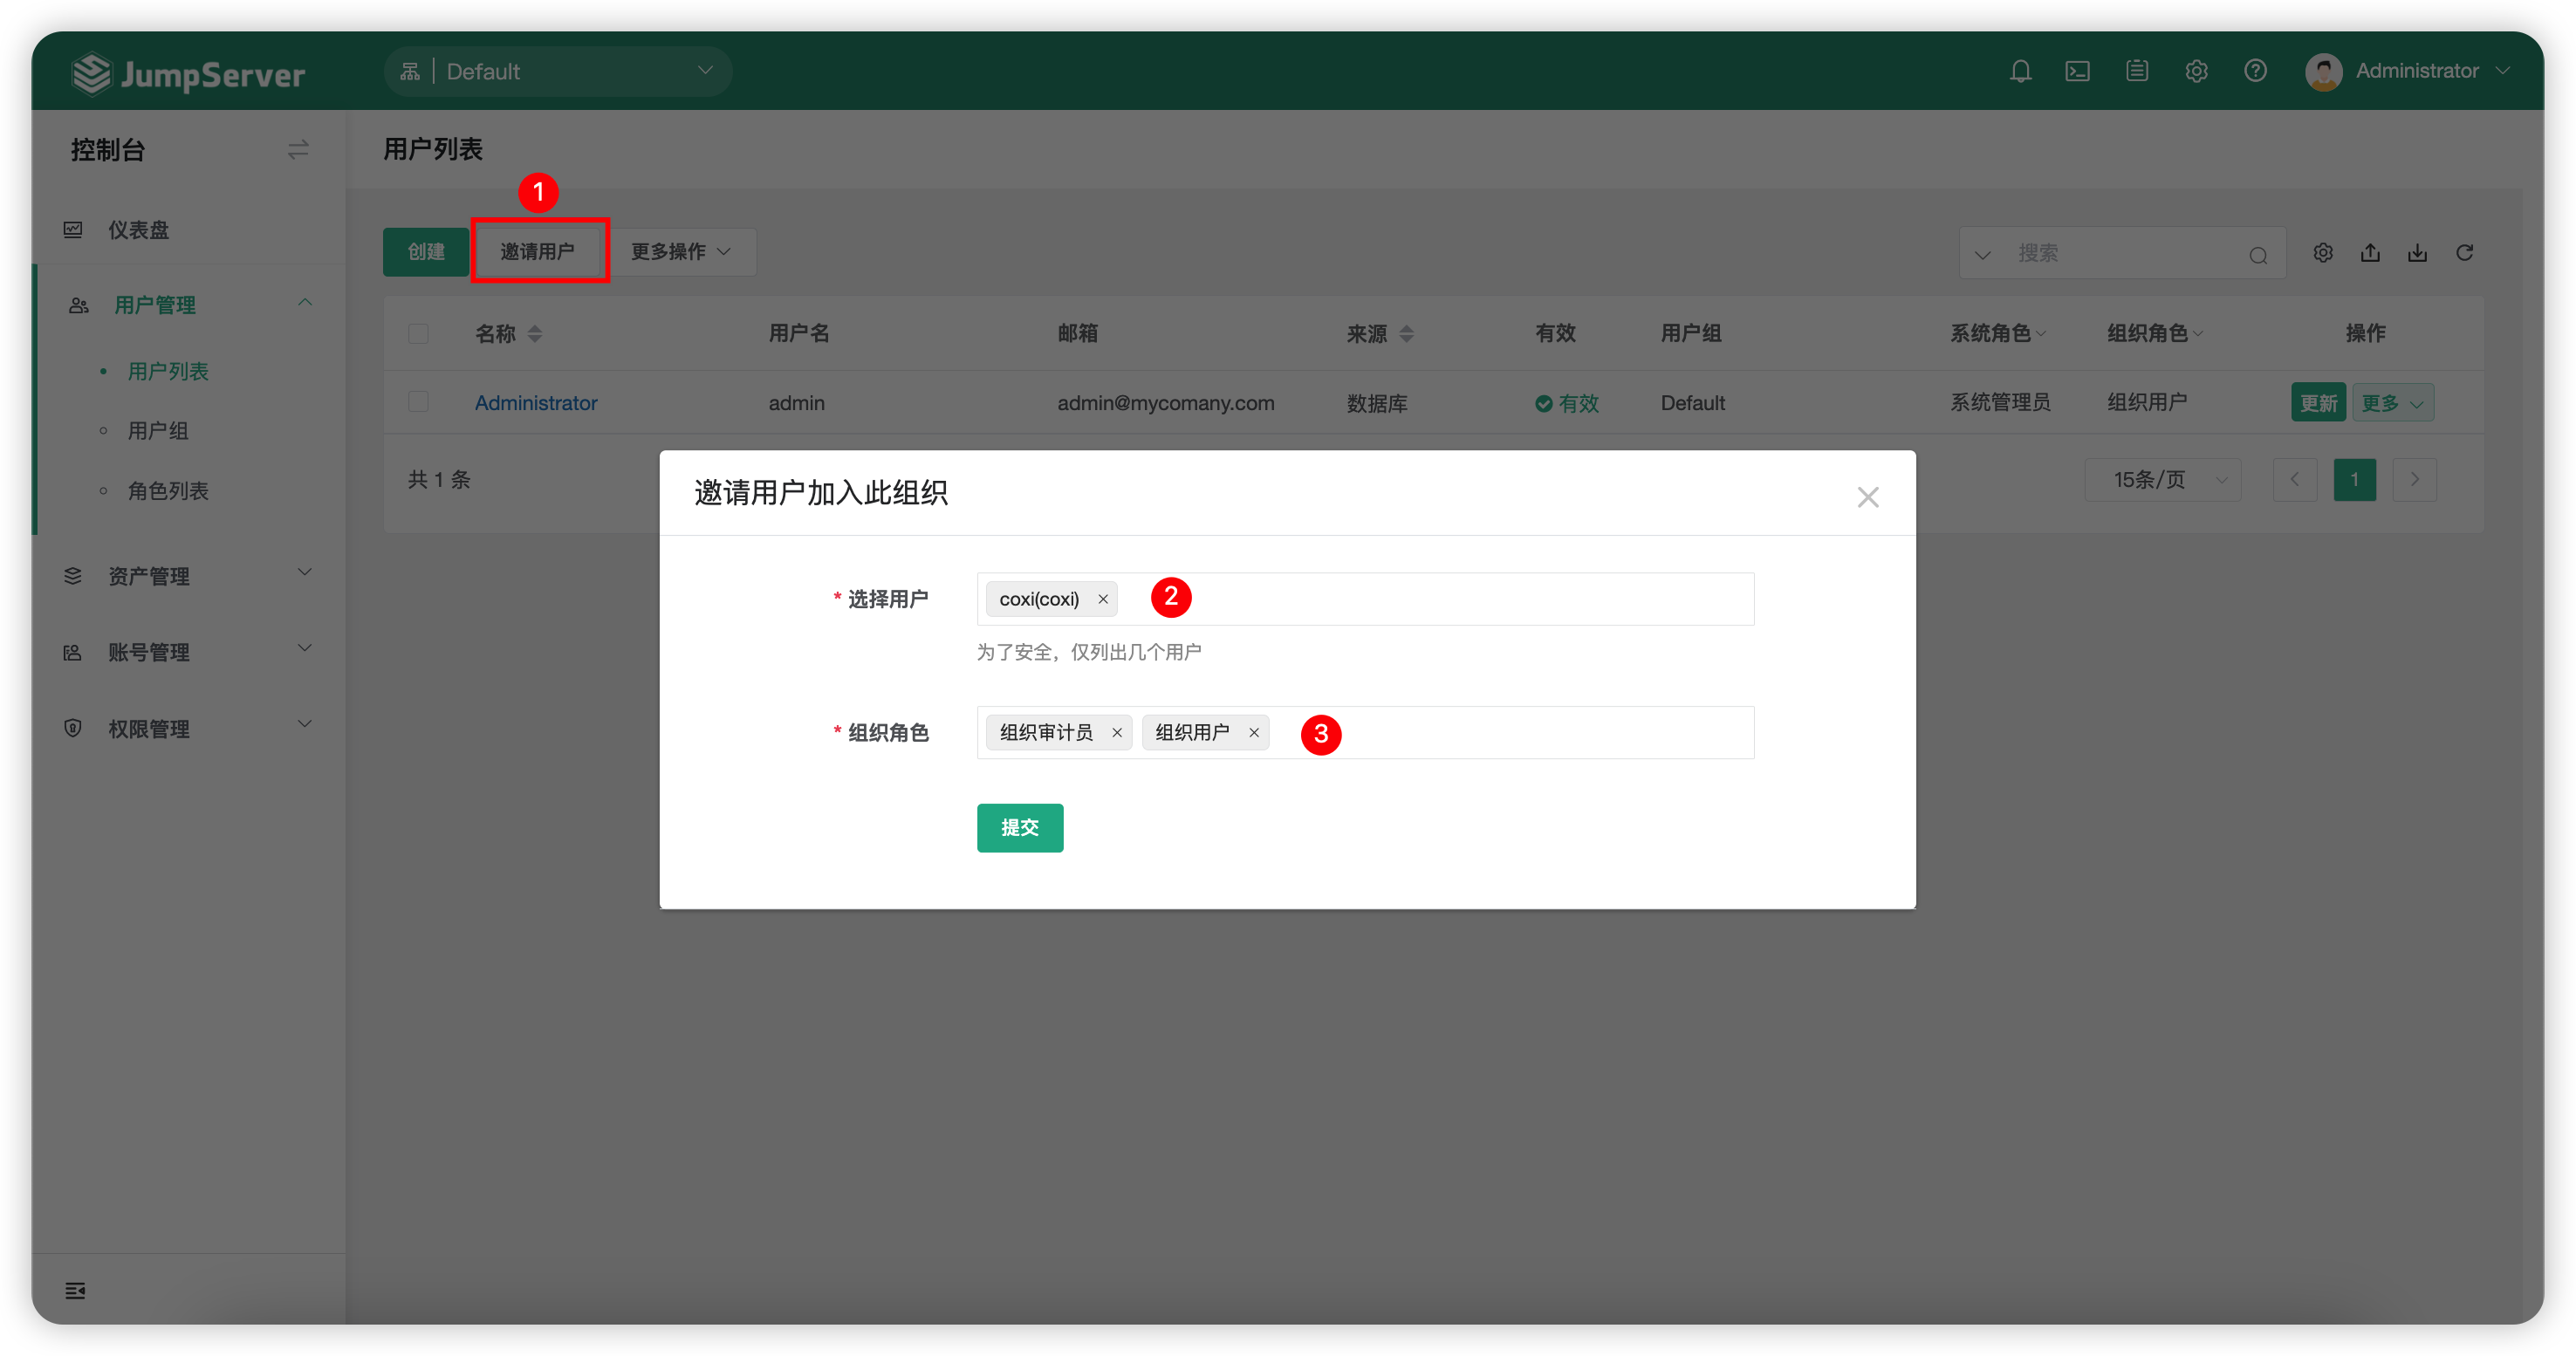
3 Invite User⚓︎
- Click on
Invite Usrbutton on the user details page to use the invite user feature. - This feature is primarily used when a JumpServer user exists in the entire system but is not part of the current organization, inviting the user to join the current organization.
- After clicking on the
Invite Userbutton, enter the user you want to invite in the popup window and set the user's organizational role in the current organization. Click theSubmitbutton to save.
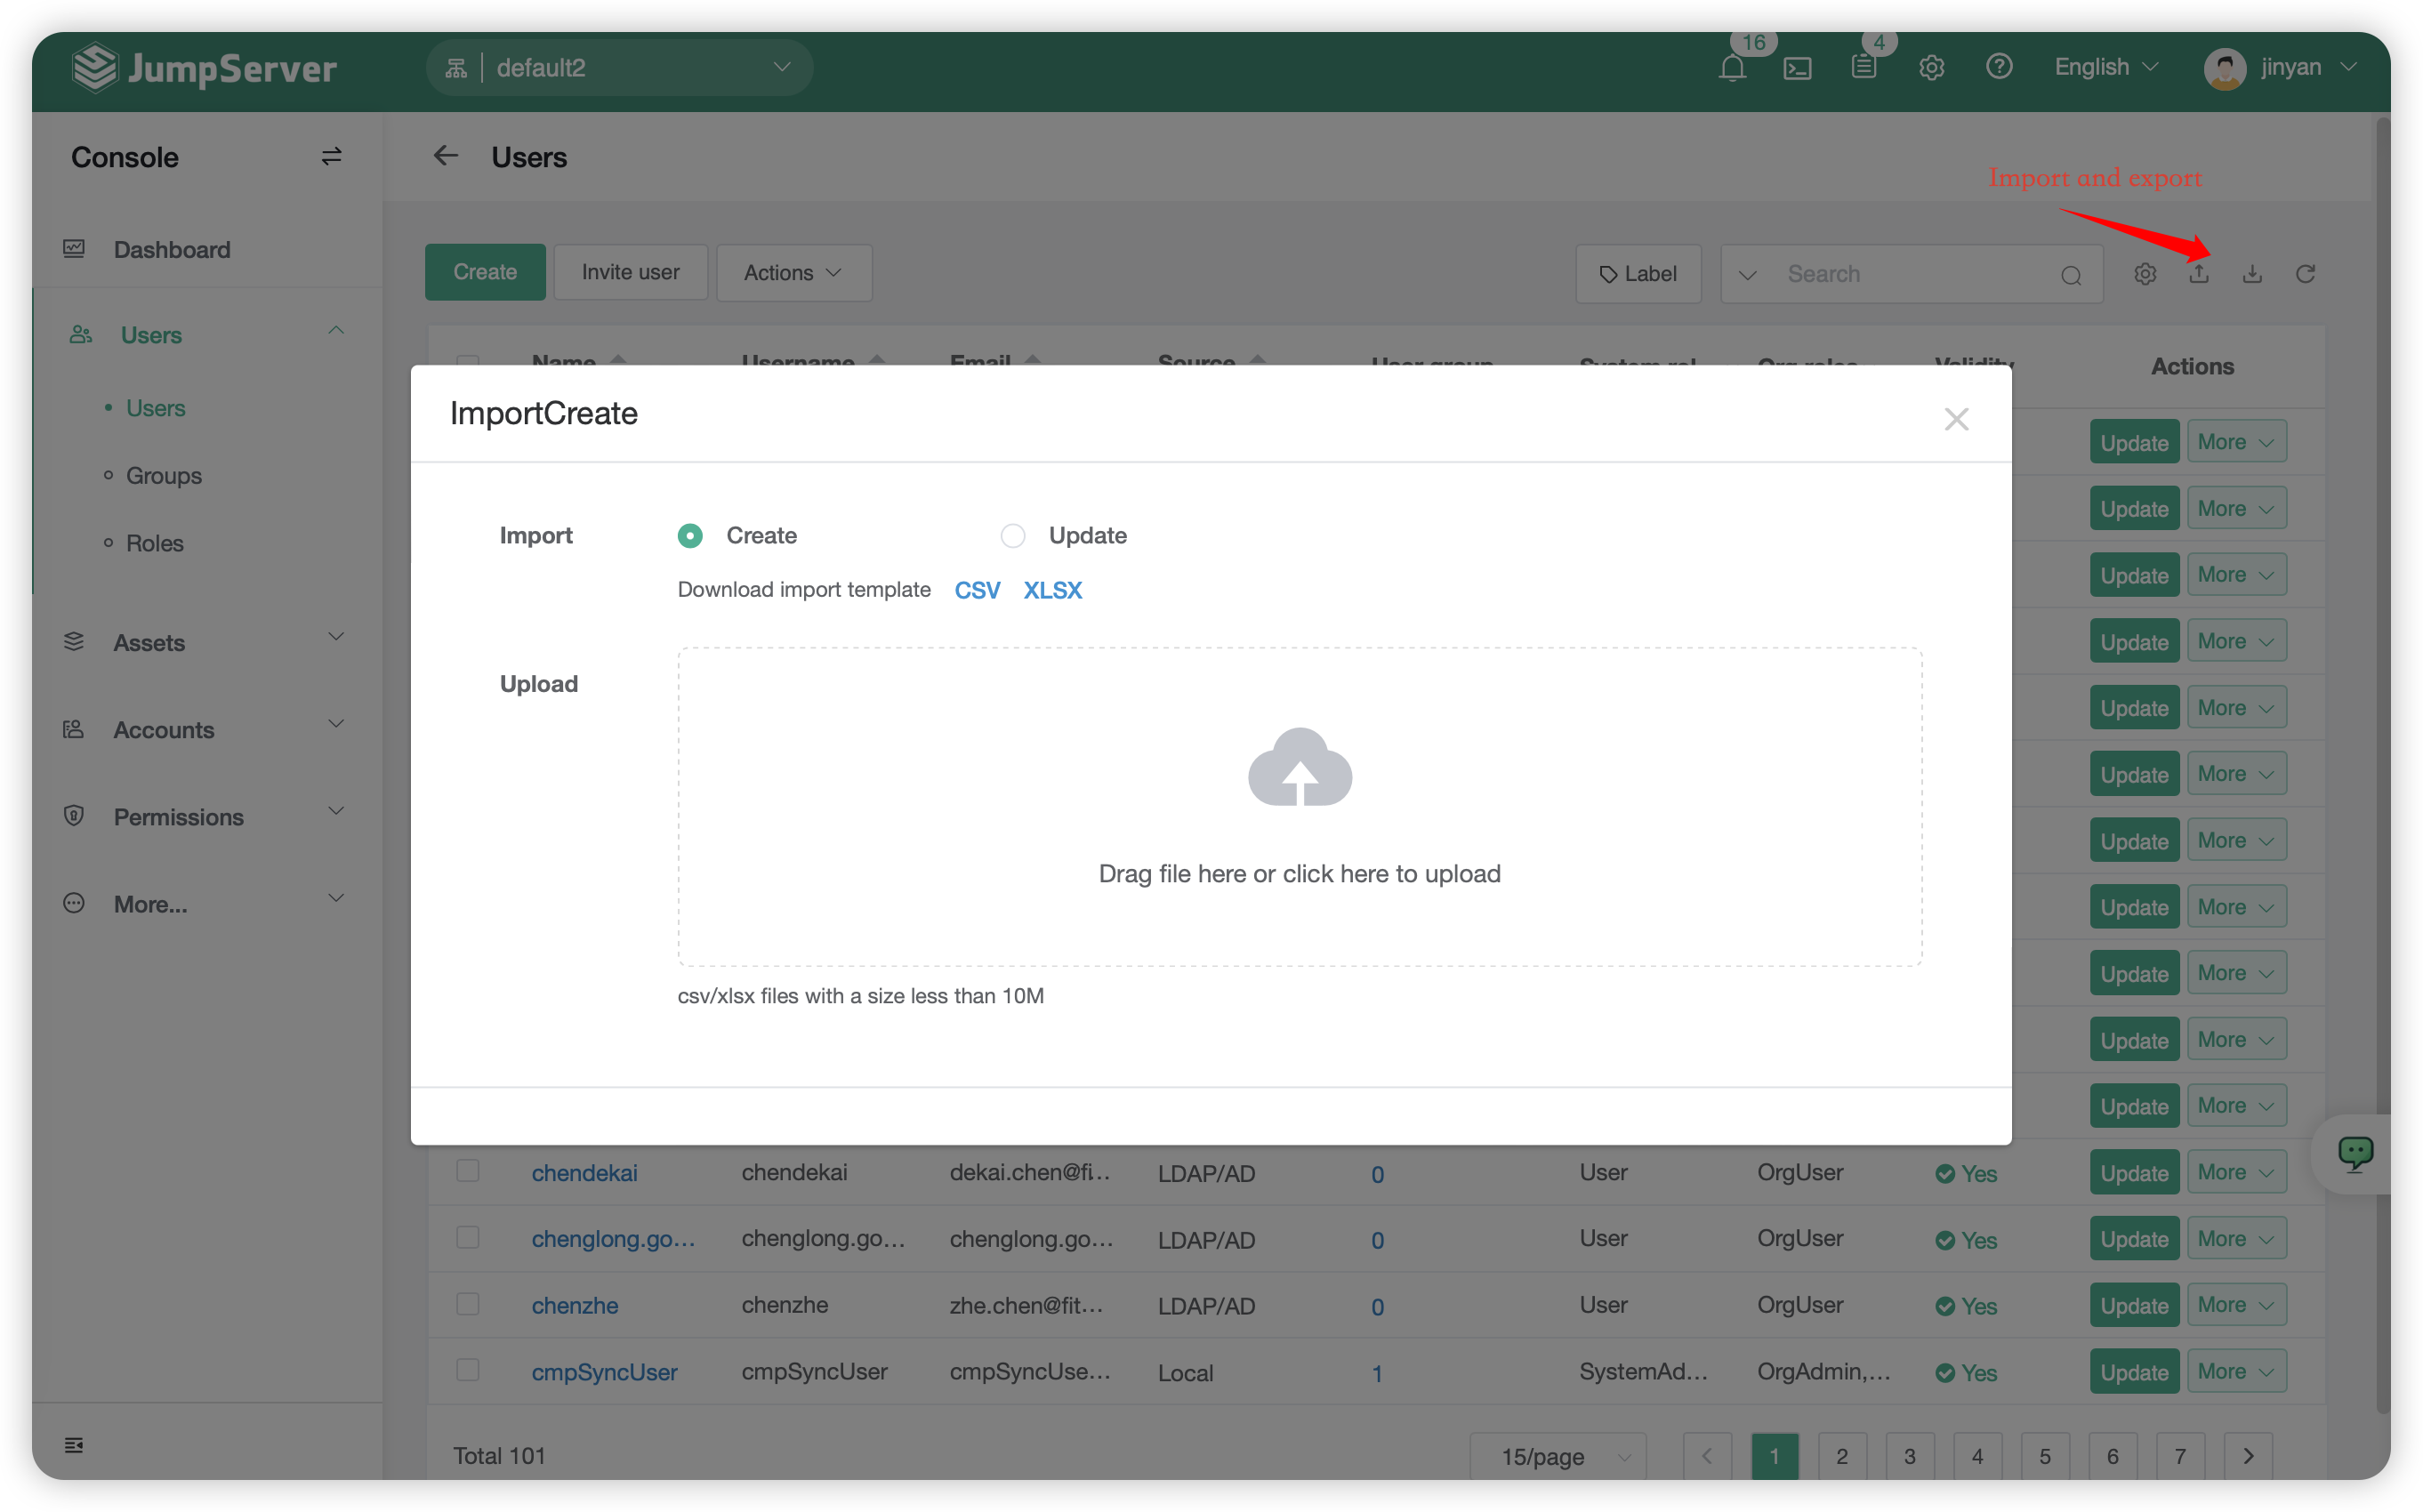
4 User import and export⚓︎
- JumpServer support import to create new user and export for existing users, with support for both
xlsxandcsvformats. - For initial import,you can click on the
Importbutton to download a template and then fill the informations for importing.
5 User details⚓︎
- Click
User nametap in pageUser list,then enter page ofUser details. - The user details page includes information such as user basic details, authorized asset, rule of asset authorization, rule of user authorization and activity logs.
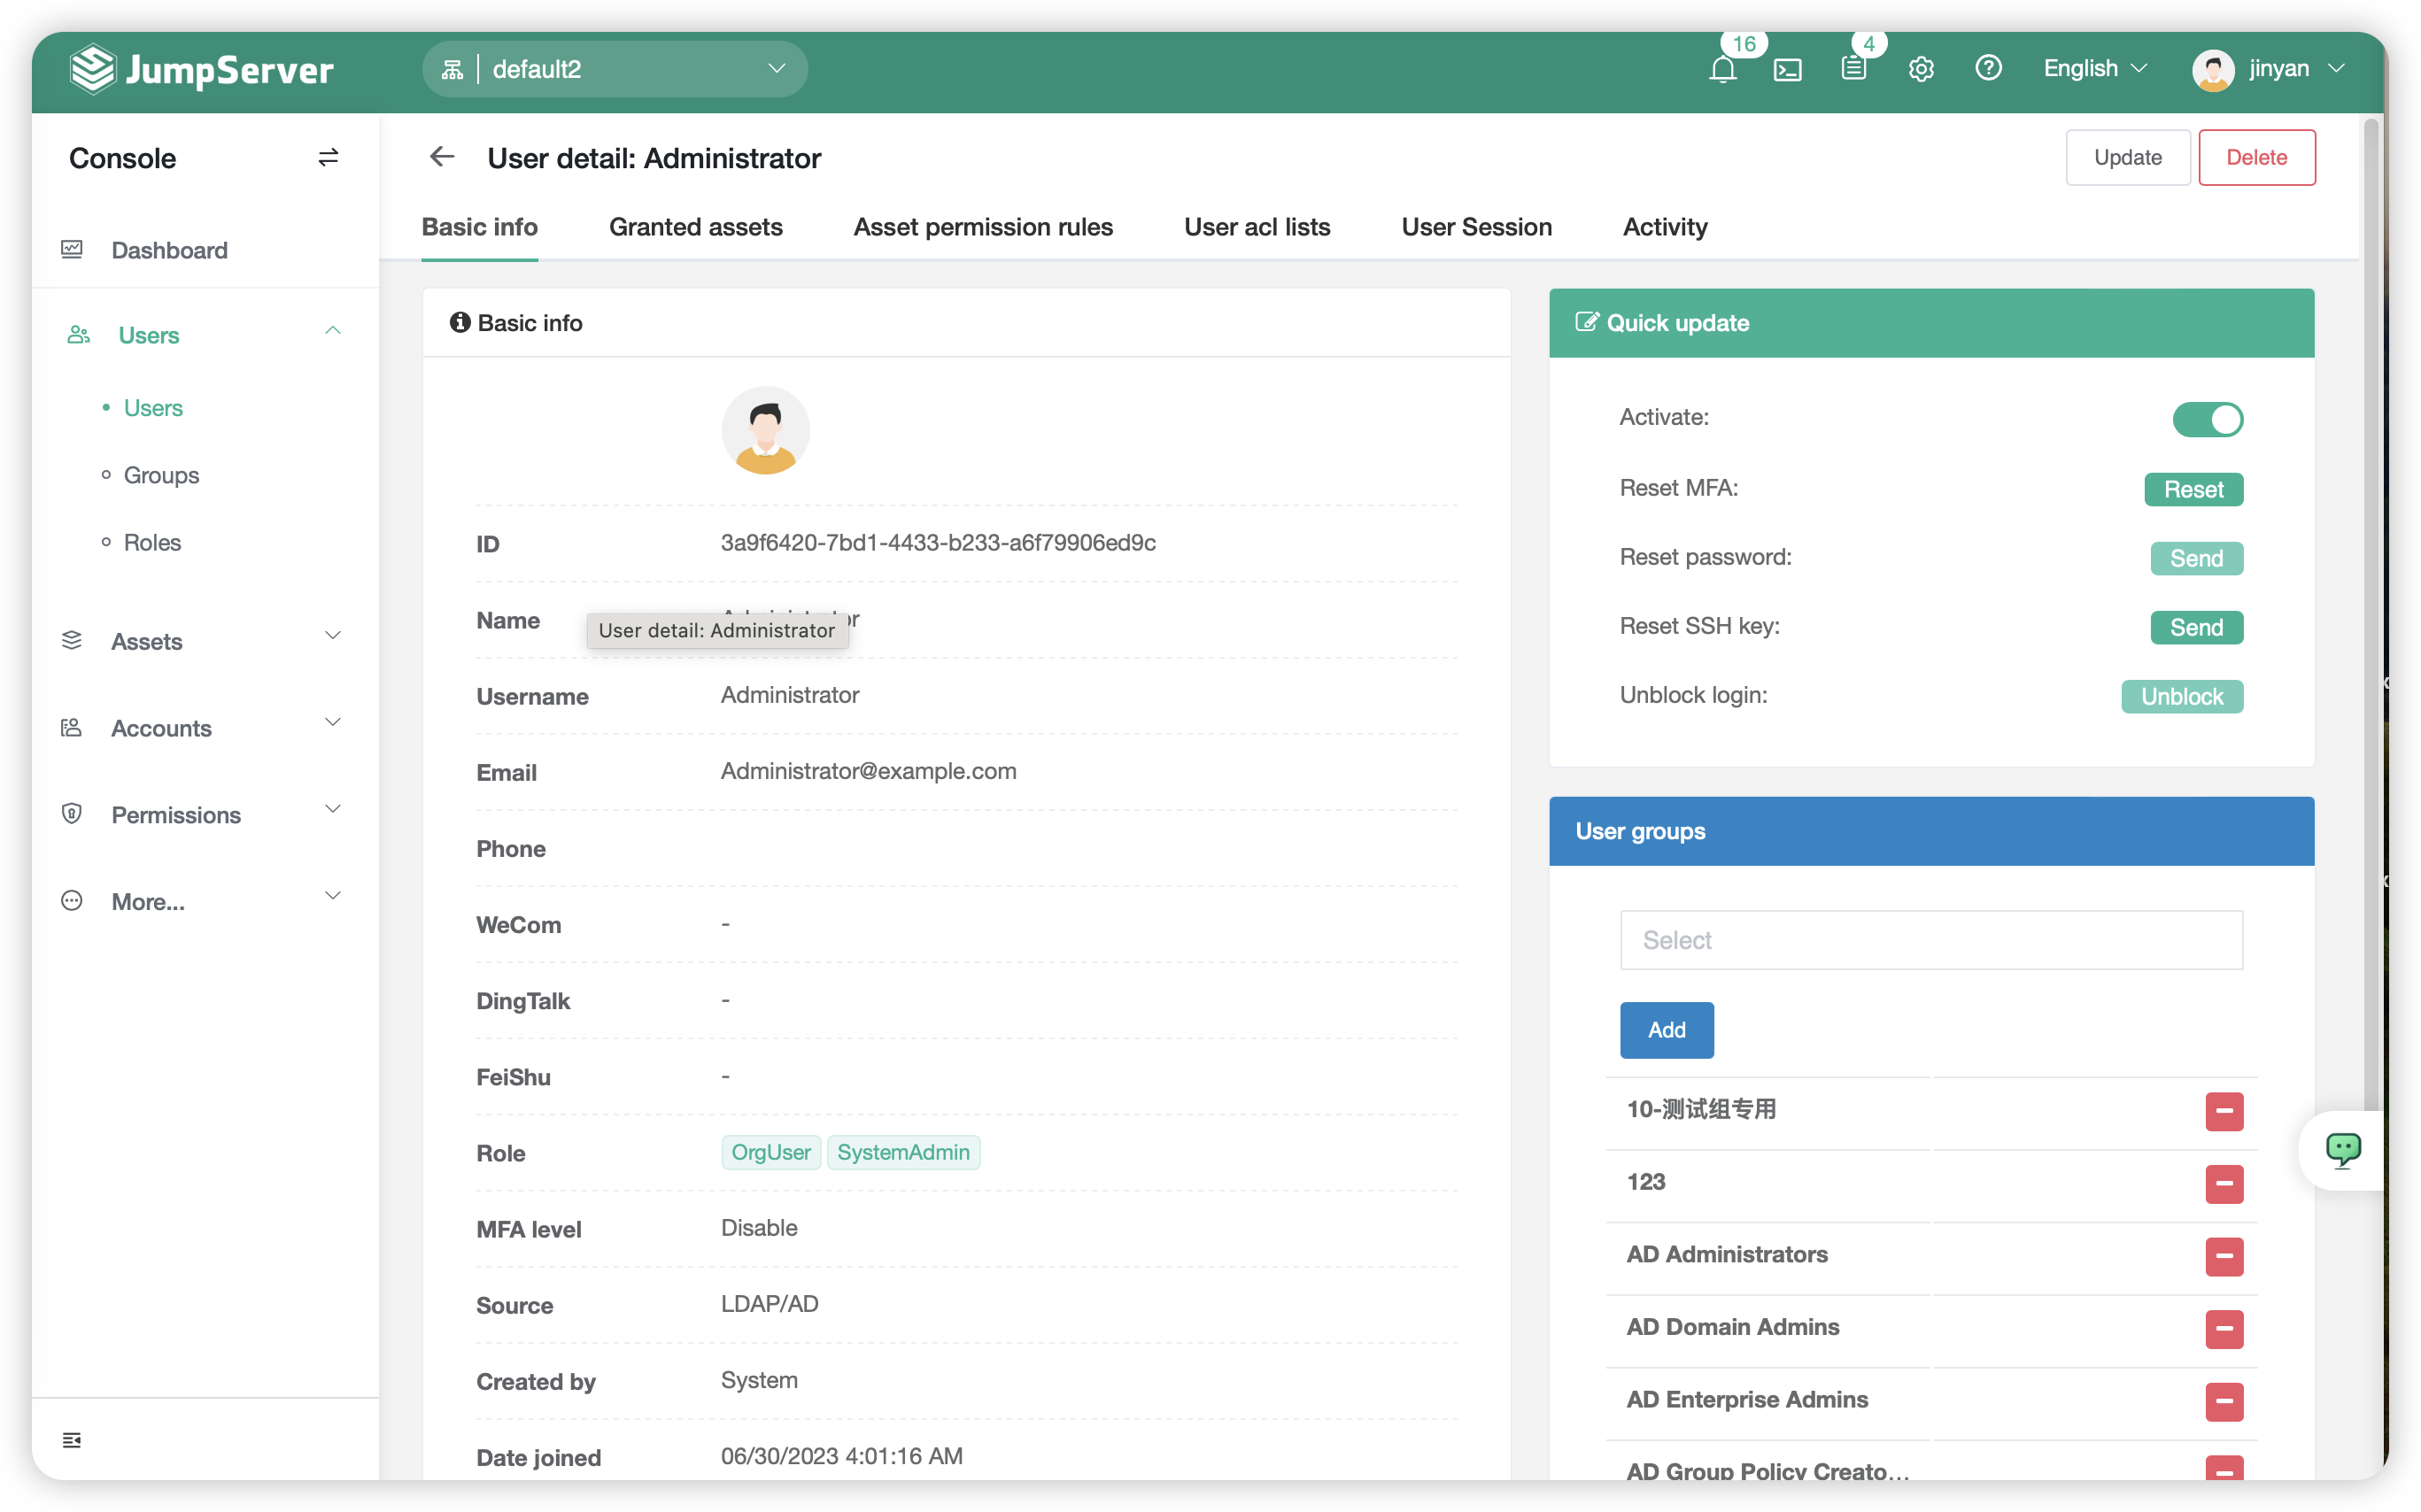
- Detailed parameter description:
| Parameter | Description |
|---|---|
| Basic information | The basic information page displays detailed information about the user, including ID, name, username, email, role, creator, and other relevant details. |
| Authorized asset | Display the list of assets authorized to this user within the current organization |
| Rule of asset authorization | Display the list of asset authorization rules that include this user |
| Rule of User login | The detailed configuration of login policy for this user. This includes configuring login rules to restrict a user's login in specific time periods and other options |
| Activity log | The activity log of the user login |
| Activated | Quick action button to allow or deny this user for logging |
| Reset MFA | Quick action button to reset the user's MFA to its initial state, requiring the user to bind MFA again during the next login |
| Reset Password | Quick action button to send an email to the user for password resetting |
| Reset Password of SSH | Quick action button to send an email to the user for SSH Key resetting |
| Unlock User | Quick action button to unlock the user's account if it has been locked due to multiple incorrect password attempts |
| Usr Group | Quick action buttons that allow you to add a user to a selected user group by choosing from a dropdown menu in the input box or click the delete button on the right side of the already joined user group list to remove them |
5.1 User lonin rules⚓︎
- Click on the
User Login Rulesbutton on theUser Detailspage allows you to set rules that restrict the user login based on IP and login time period. - Config the detailed login rule in this page and click on
Submitbutton to save and take effective.
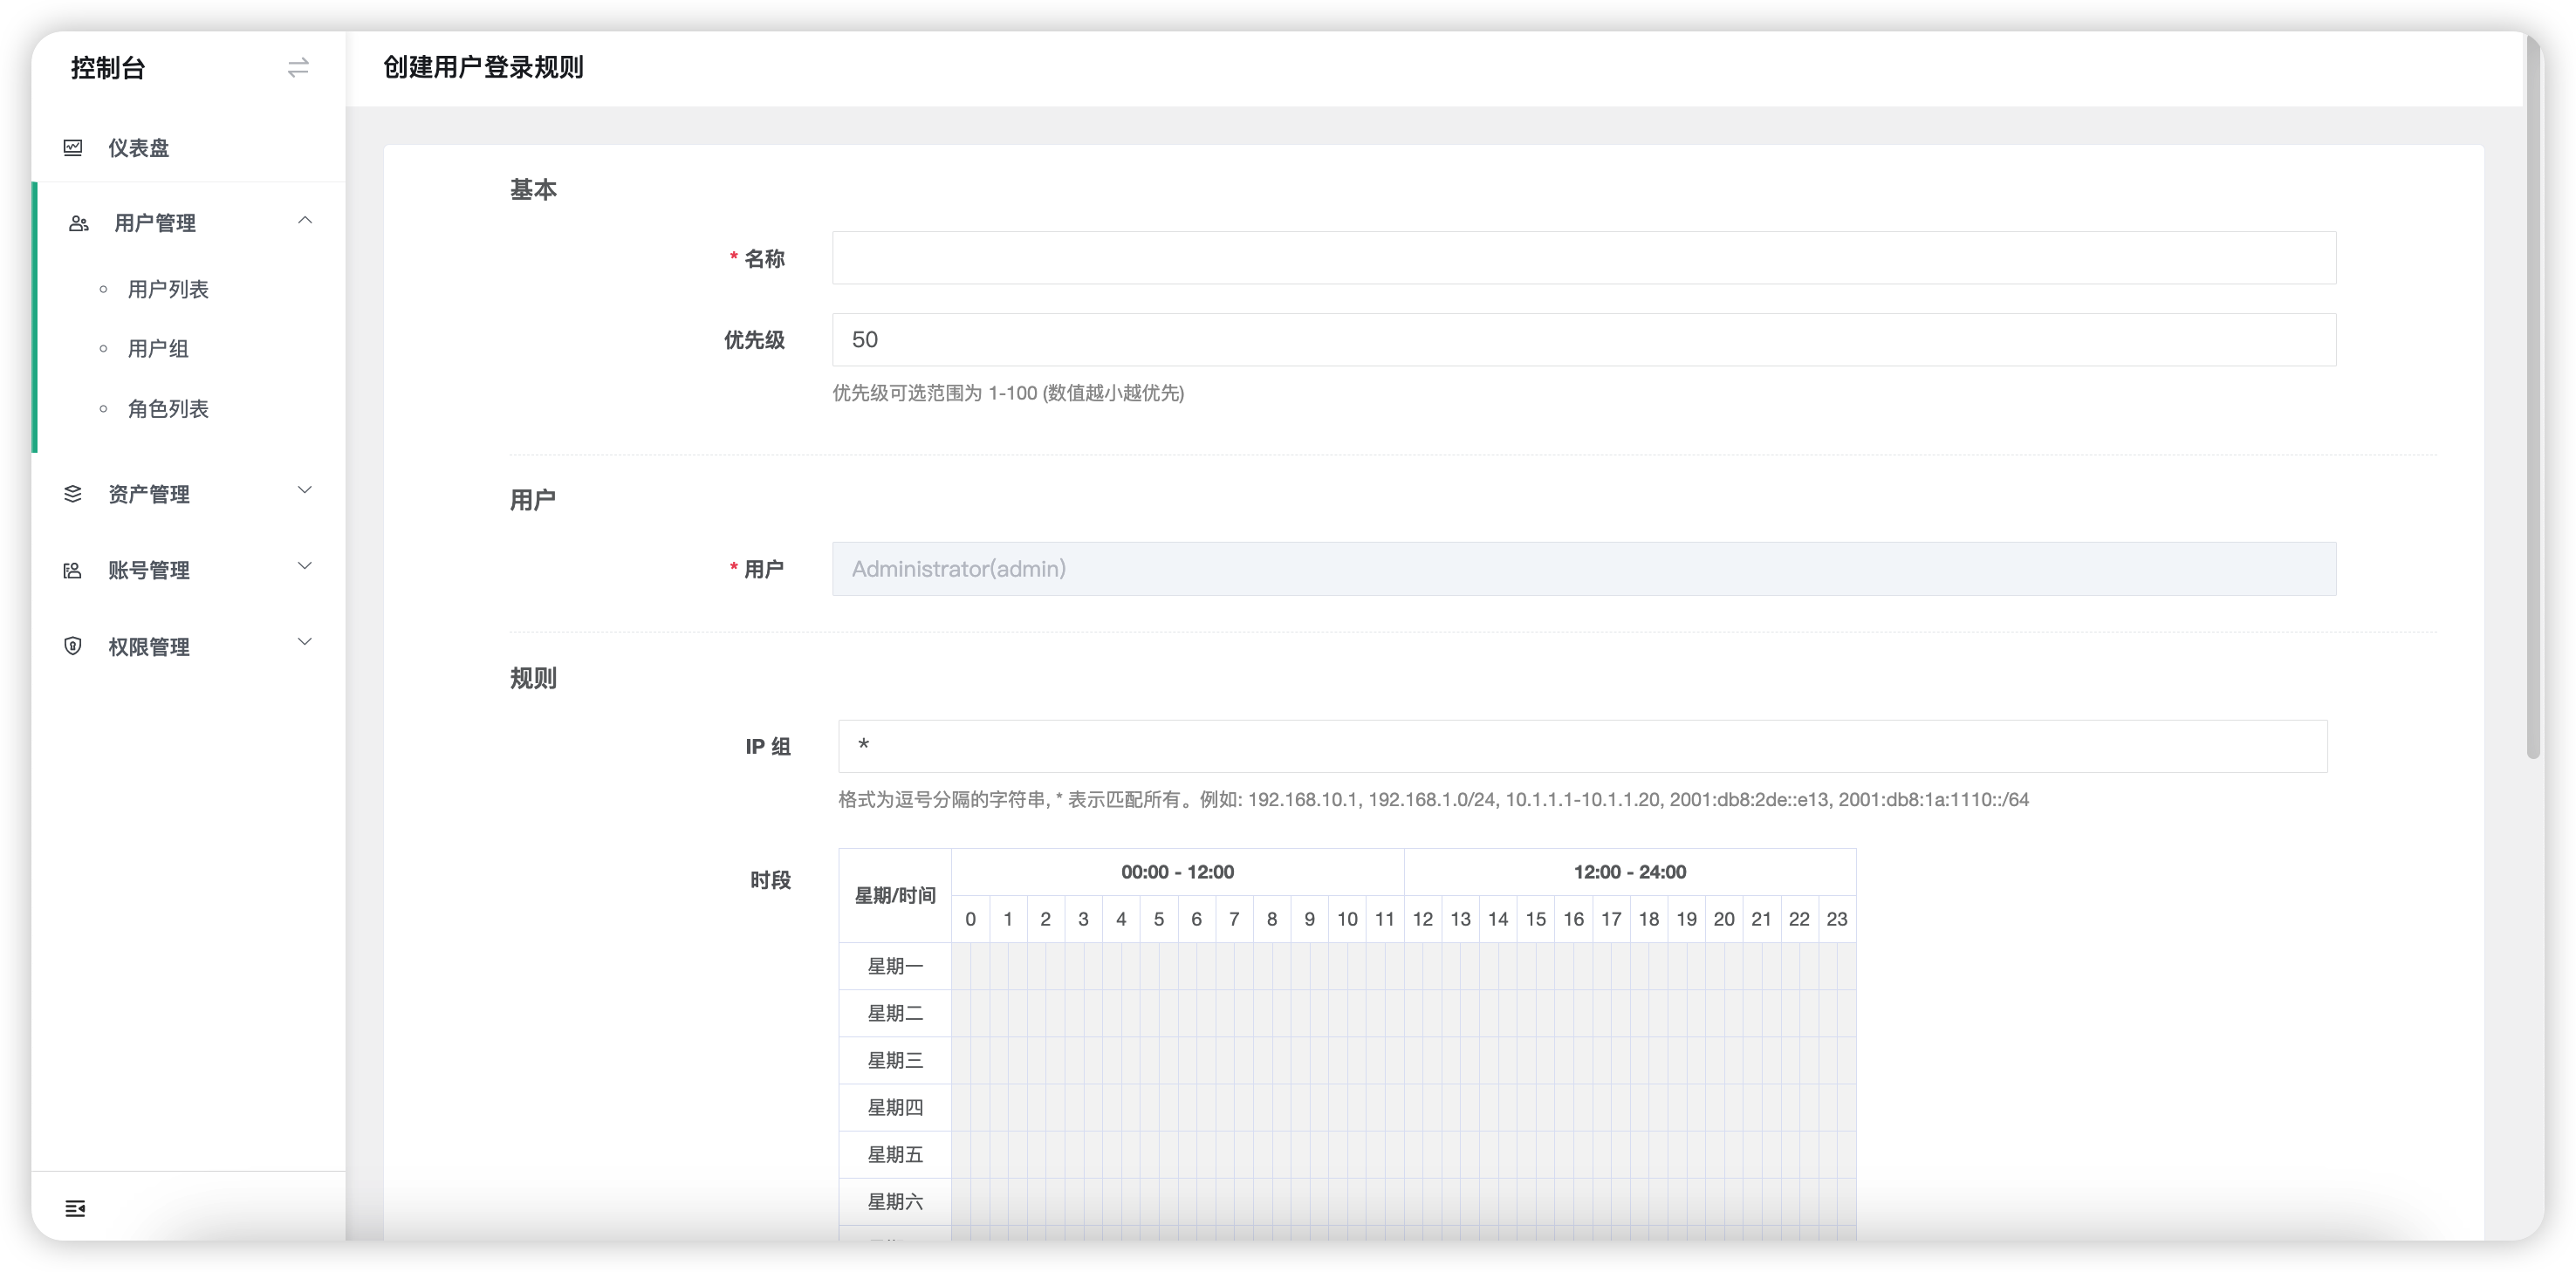
- Detailed parameter description:
| Parameter | Description |
|---|---|
| Name | Name of the login rule |
| Priority | Specify the priority of the login rule. A lower number indicates a higher priority |
| IP 组 | Specify the login IPs restricted by this login rule, the format is a comma-separated string, where '*' represents matching all IPs。 For example: 192.168.10.1, 192.168.1.0/24, 10.1.1.1-10.1.1.20, 2001:db8:2de::e13, 2001:db8:1a:1110::/64。The IP is the IP of he IP address used by the user during login |
| Time Period | Specify the time period restricted by the login rule |
| Action | Specify the action to be taken when this login rule is executed. You can choose "Deny" to reject the user login, "Allow" to permit the user to login, or "Login Review" to require approval from designated approvers before allowing the user to log in |
| Activated | Indicate whether the rule is active or not |
6 Updete User Information⚓︎
- When there is a need to update information for a specific user, you can click on
Updatebutton next to the user on theUser Listpage to update their information.
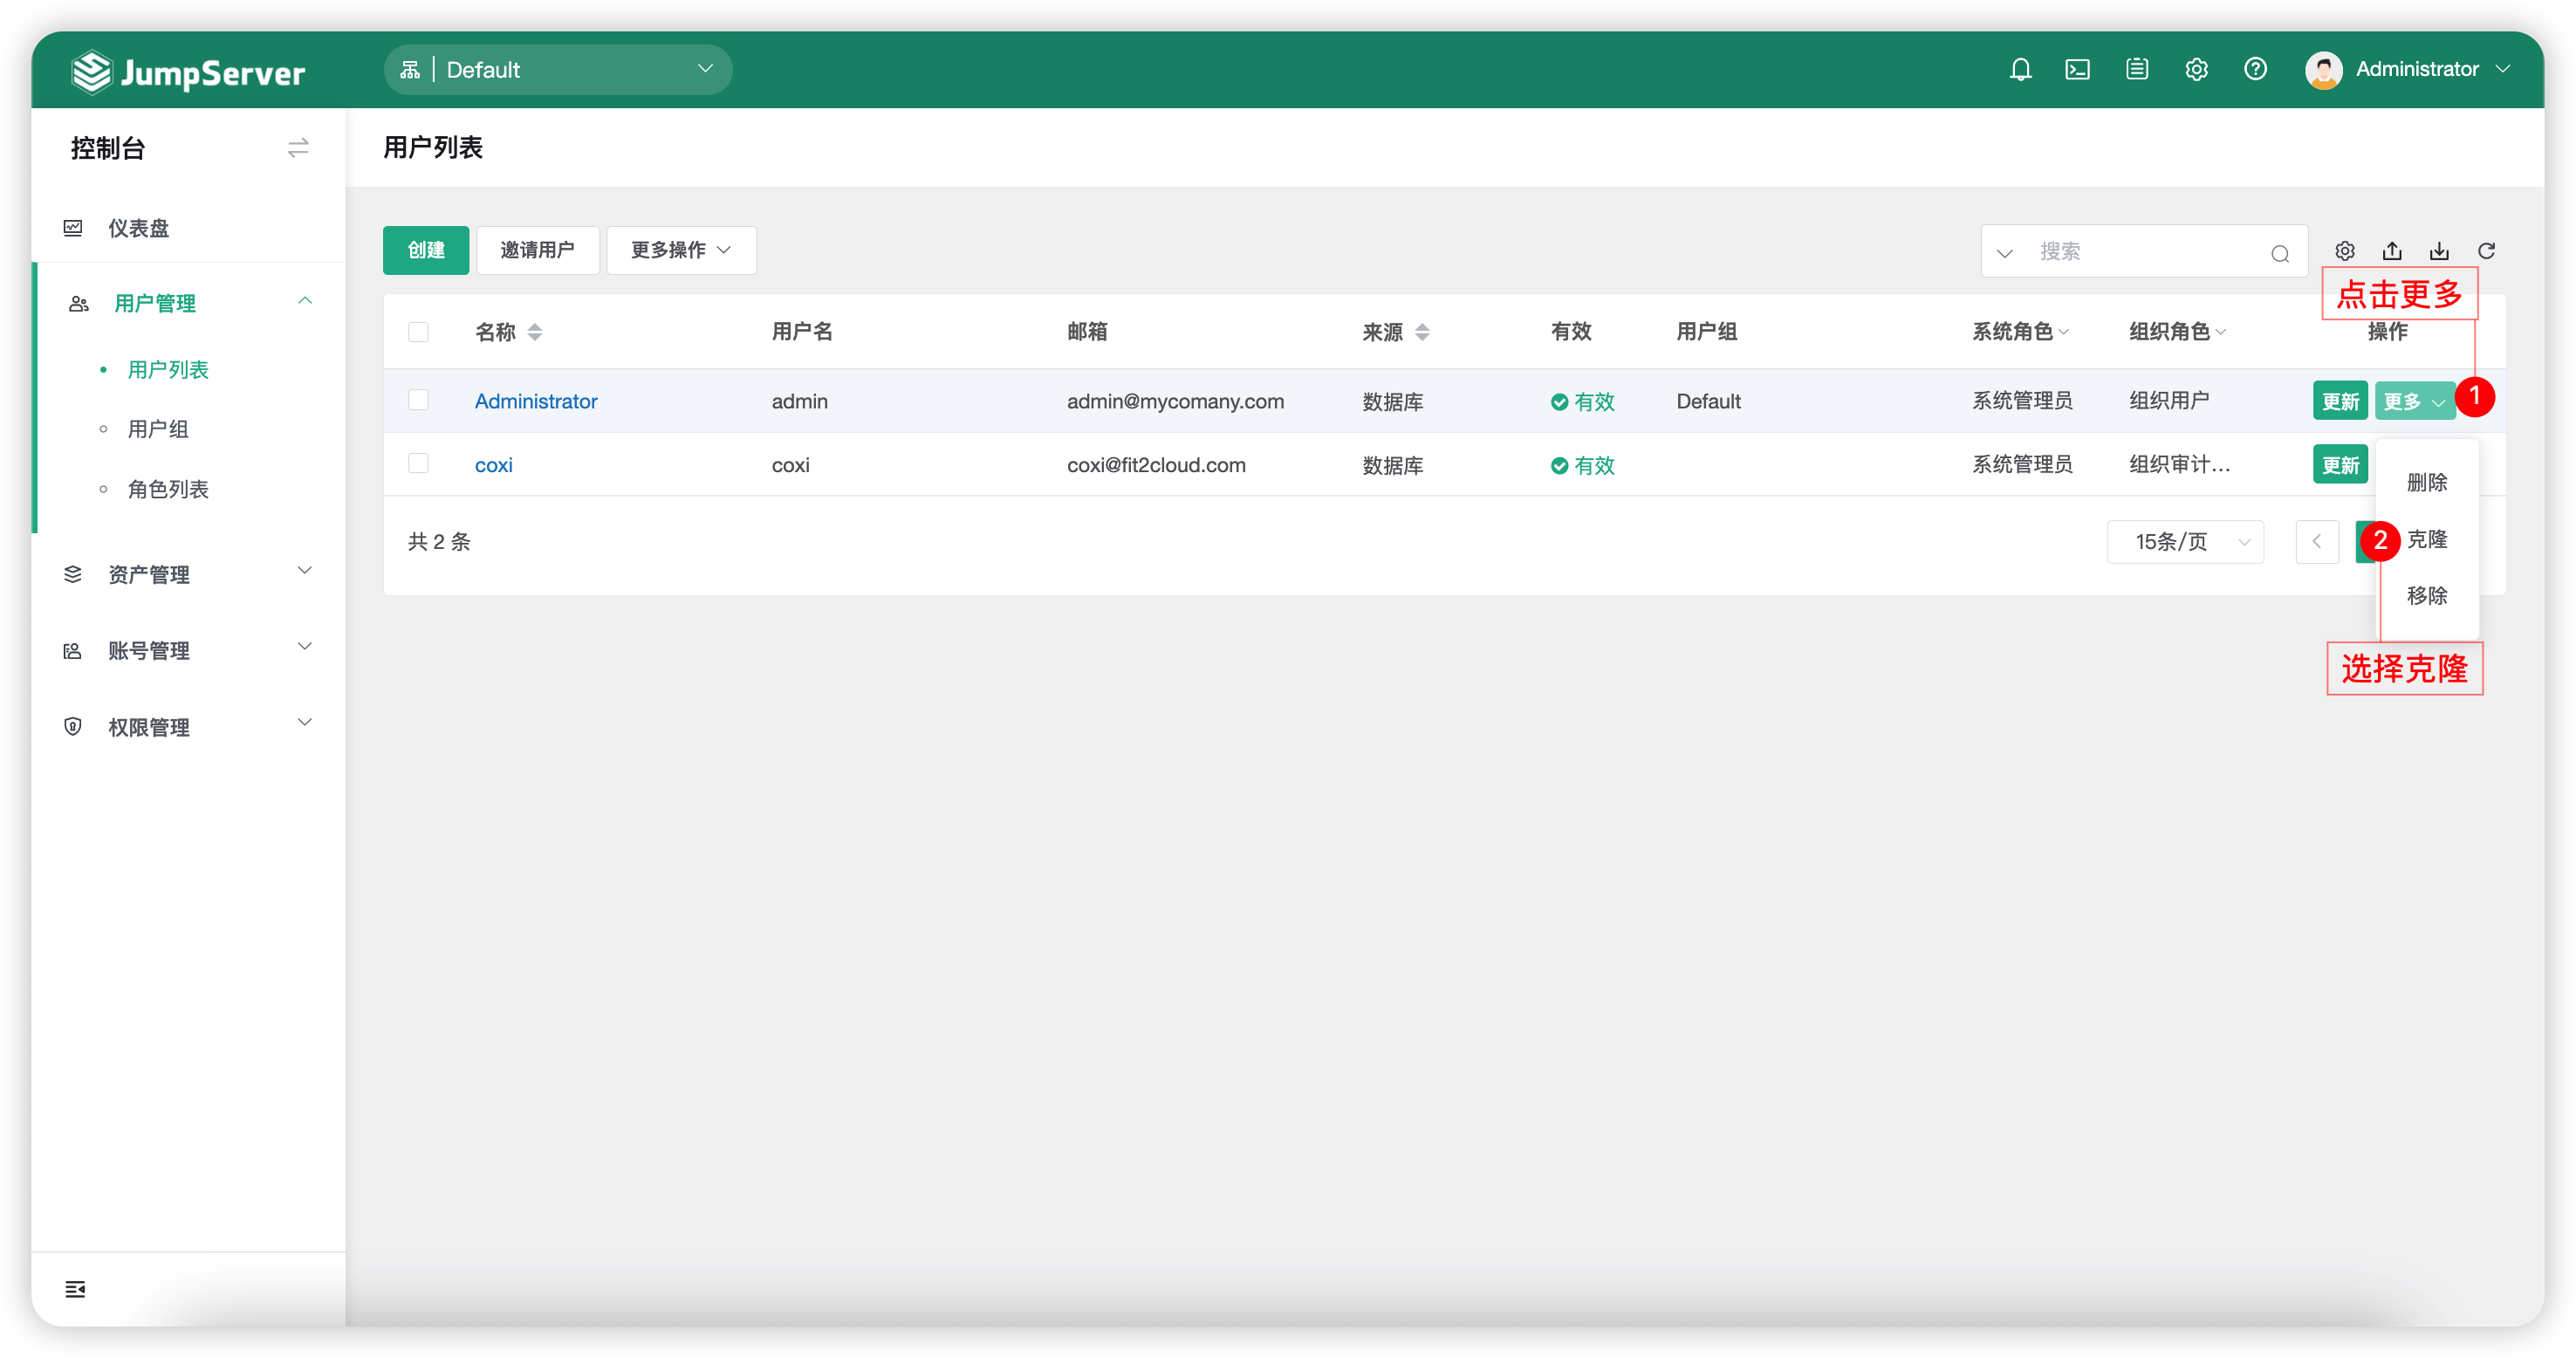
7 Clone User⚓︎
- For situations where user information is the same or mostly the same, you can click on the
Morebutton next to the user, select theClonebutton and update the user's information, then submit the changes.
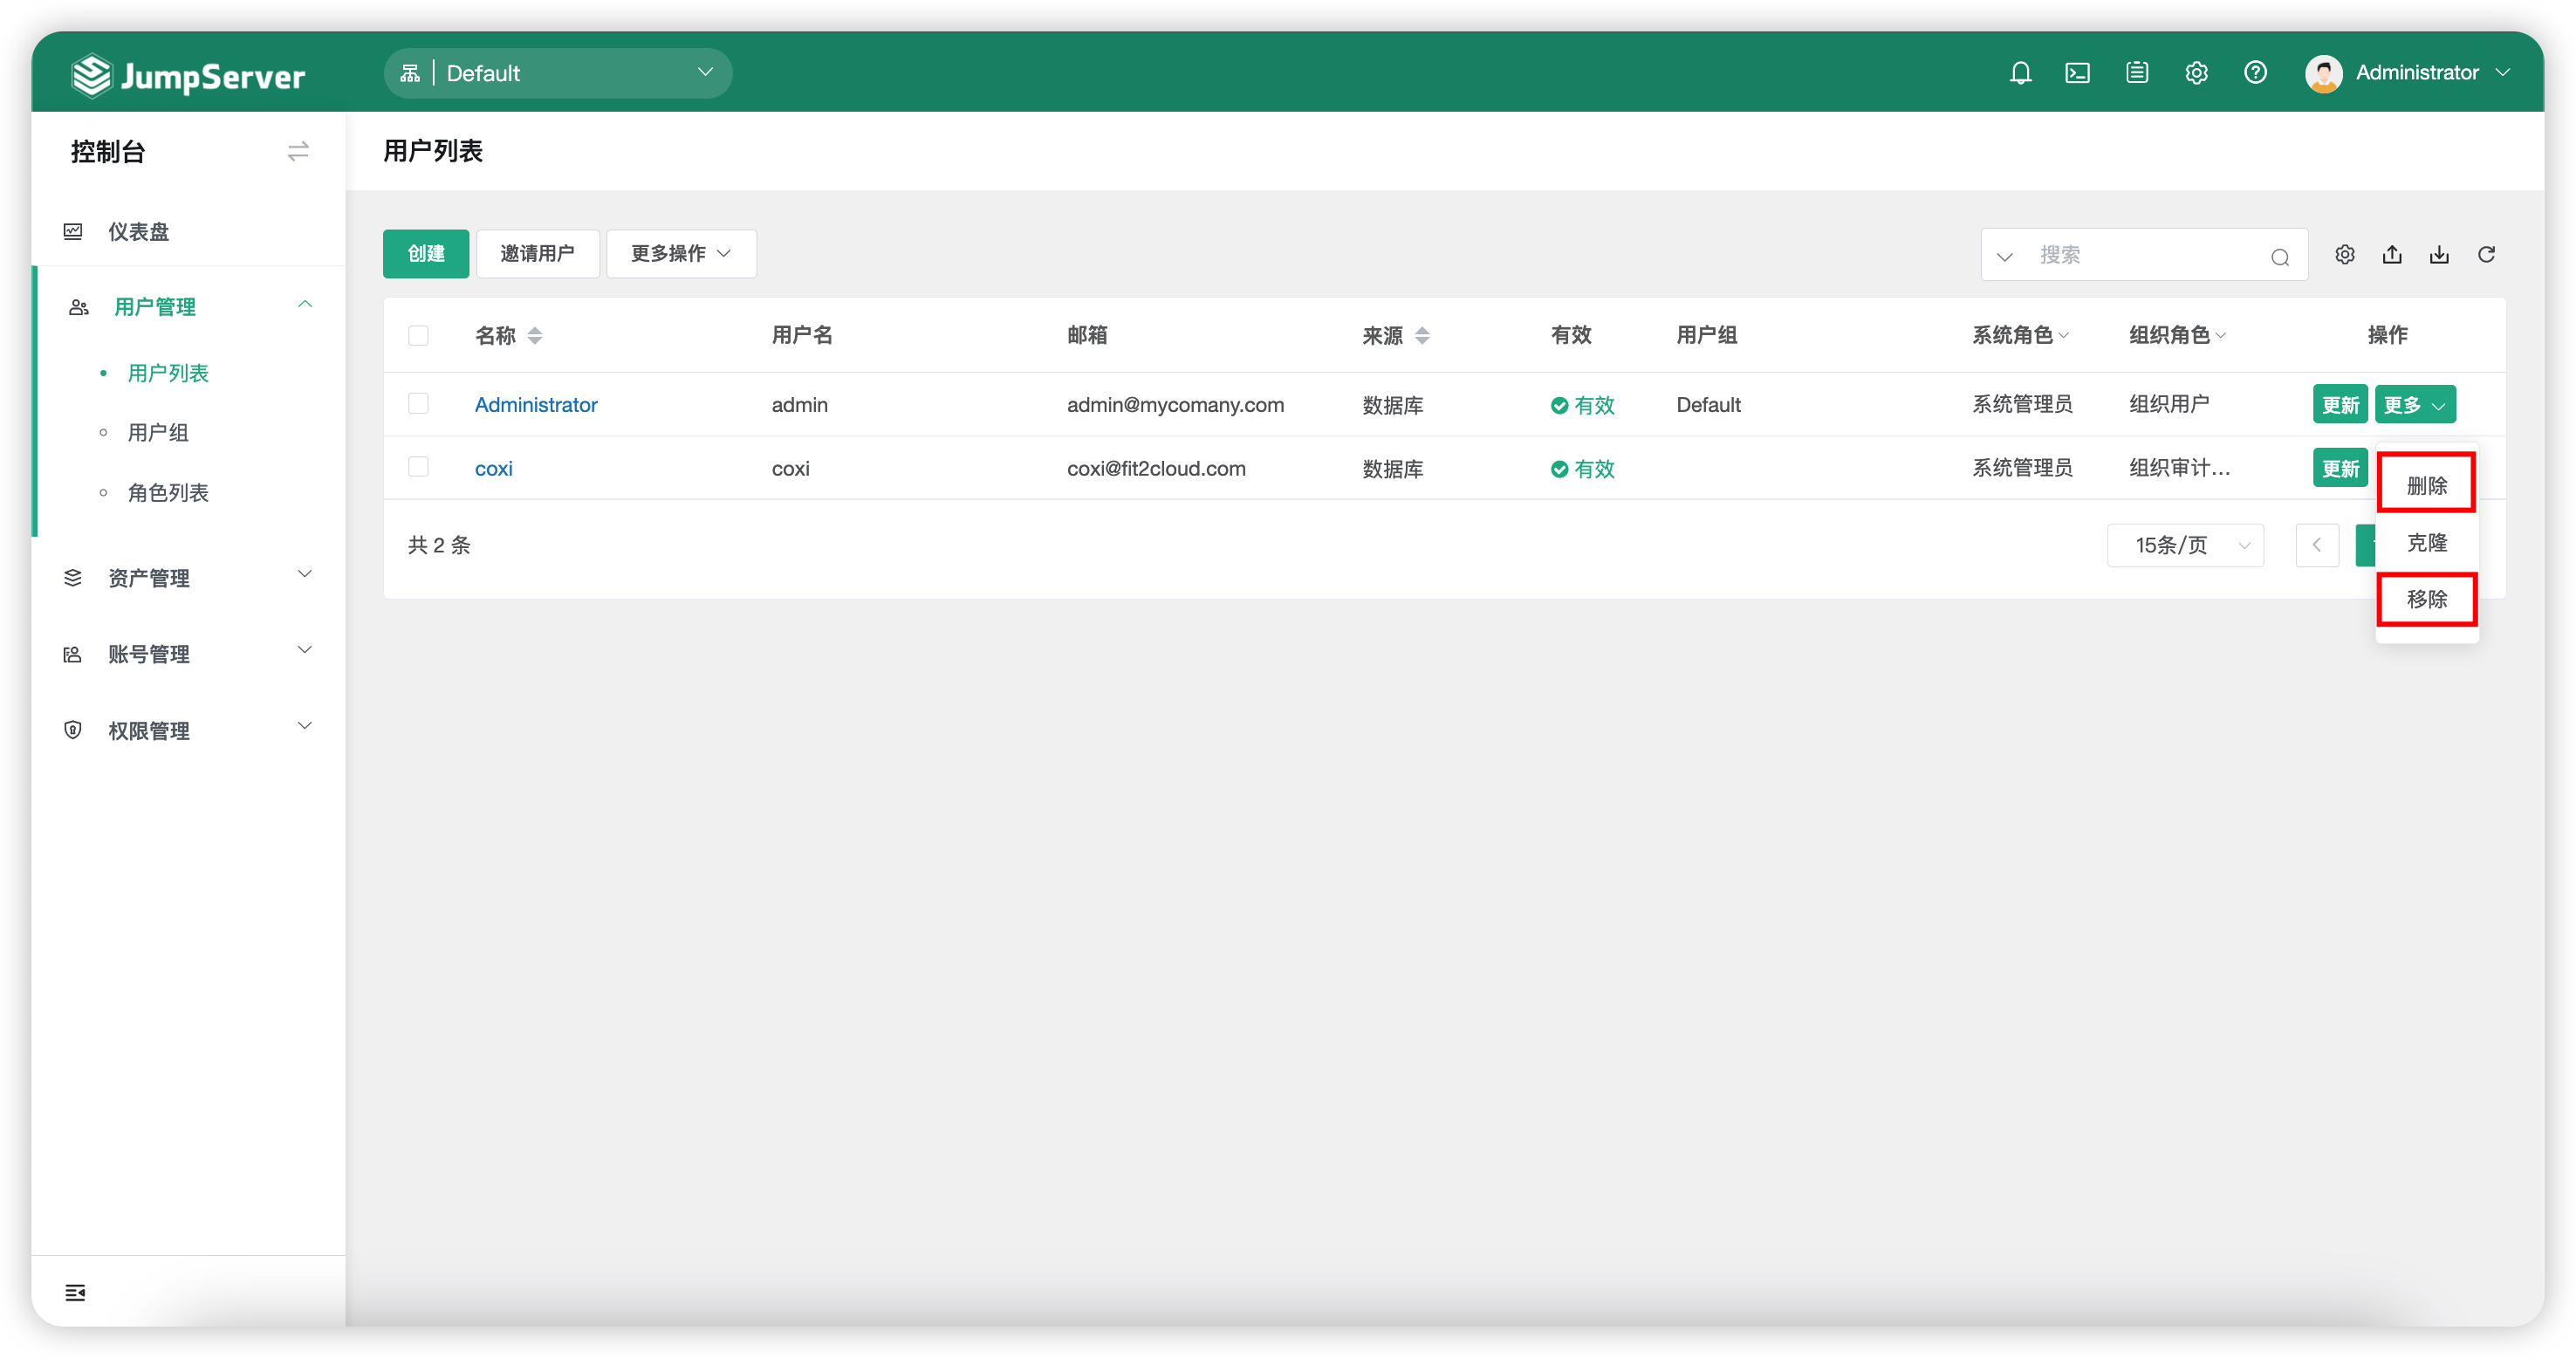
8 User delete and remove⚓︎
- When there is a need to remove a user from the current organization, you can click the
Morebutton next to the user and select theRemovebutton. (This operation can be undone by inviting the user again to join the current organization). - When you need to delete a user from the entire JumpServer system, click on the
Morebutton next to the user and select theDeletebutton. (This operation will delete the user's data from the database, and the operation is irreversible)